US Travel Document Rules: Getting Your foto passaporto americano Approved
An application center clerk opens the queue on Monday morning and immediately discards three applications because the backgrounds are slightly gray rather than stark white. If you are applying for US travel documents from Europe, securing a compliant foto passaporto americano is the first technical hurdle you face. "The system rejected my image" is not a diagnosis; it is a symptom of failing one of several distinct biometric requirements enforced by the US Department of State. These rules do not bend for bad lighting, phone camera distortion, or squirming infants. To stop guessing and start passing the automated checks, you must understand exactly how the validation software measures your face, why standard photography techniques fail, and what you can check on your own image before you submit it.
Quick Summary
A US passport or visa photo requires strict adherence to biometric specifications, including exact facial proportions, a shadow-free stark white background, and neutral expressions.
- Photos must measure exactly 2x2 inches (51x51 mm) with the head sized between 1 and 1 3/8 inches.
- Wide-angle smartphone lenses distort facial geometry and cause automatic rejections.
- Infant photos require specific physical setups to hide support mechanisms and parental hands.
- Digital visa uploads demand sRGB color profiles and strict file size limits under 240kB.
Table of Contents
- Why the State Department rejects a foto passaporto americano
- Biometric measurement dictates exact facial proportions
- Smartphone wide-angle lenses distort biometric facial geometry
- Infant applications require entirely different physical setups
- Digital uploads and physical prints demand different resolutions
- Shadows behind the ears trigger automatic validation failures
- Uniforms and camouflage patterns guarantee an immediate rejection
Why the State Department rejects a foto passaporto americano
The US State Department does not review your submitted photo as a portrait; their software scans it as a topographical map of your facial features. When a foto passaporto americano is rejected at the consular or domestic level, the failure usually stems from geometry, contrast, or occlusion rather than sheer image quality. Four distinct failures account for the vast majority of rejections: background texture interference, uneven facial illumination, incorrect eye-level placement, and unauthorized accessories.
Background interference occurs when the white space behind your head contains gradients, textures, or shadows. The software relies on a stark contrast between the edge of your face and the background to define the outline of your head. If you stand too close to a textured wall, the system struggles to find where your hair ends and the wall begins. Uneven illumination causes one side of your face to appear brighter than the other, which shifts the perceived centerline of your nose and alters the distance between your pupils.
Before you upload or print your passport photo, you can diagnose these issues yourself. Open your image on a computer monitor, turn the brightness to maximum, and look exclusively at the background. If you can see the texture of the drywall or a gradient where the light falls off near the bottom corners, the background is not uniformly white. For lighting, draw an imaginary vertical line down the center of your nose. If the shadow cast by the bridge of your nose falls heavily to one side, your light source is off-axis and will likely trigger a rejection.
Biometric measurement dictates exact facial proportions
The foundational rule of a US travel document image is the physical footprint: it must measure exactly 2 by 2 inches (51 by 51 mm). However, simply cutting a piece of paper to those dimensions does not make the photo compliant. The internal geometry is strictly regulated. The distance from the bottom of your chin to the top of your head (including your hair) must measure between 1 inch and 1 3/8 inches (25 to 35 mm). Furthermore, your eyes must sit between 1 1/8 inches and 1 3/8 inches (28 to 35 mm) from the bottom edge of the photo.
These exact measurements exist because border control agencies use automated facial recognition gates. These gates scan the encoded chip in your physical passport, extract the digital biometric template, and compare it to a live scan of your face. If the printed proportions were incorrect during the manufacturing stage, the baseline template is flawed, and the live gates will flag you for manual review. The software sets its axis based on pupillary distance and the location of the chin. If you tilt your head even slightly upward or downward, you alter the vertical distance between your chin and your eyes, violating the required ratio.
To verify this before submission, you must print a test sheet. Do not attempt to measure these proportions on a digital screen, as screen scaling will give you false readings. Print the 2x2 inch image at 100% scale without borderless printing enabled. Lay a physical ruler flat against the print. Place the zero mark exactly on the bottom edge of your chin and ensure the top of your hair falls cleanly within the 1 to 1 3/8 inch mark. If it does not, you must crop and resize the source image again.
Smartphone wide-angle lenses distort biometric facial geometry
Most applicants now attempt to capture their photos using modern smartphones. The primary camera on almost every modern smartphone utilizes a wide-angle lens, typically equivalent to a 24mm or 26mm focal length on a full-frame camera. Wide-angle lenses suffer from barrel distortion when placed close to a subject. When a user holds a phone twelve to eighteen inches from their face to take a selfie, the lens artificially enlarges the center of the image (the nose and forehead) and stretches the edges backwards, causing the ears to recede or disappear entirely from the frame.
This optical distortion physically alters your biometric data. The automated validation software expects orthogonal projection - a flat, undistorted mapping of your facial features. Barrel distortion makes the face appear narrower and the nose more prominent, which causes the facial recognition matching algorithm to fail. The State Department explicitly prohibits selfies for this exact reason; arm's-length photography fundamentally warps human facial geometry.
Practical rule: To eliminate wide-angle barrel distortion when using a smartphone, step back at least four to five feet from the subject and switch to the 2x or 3x optical telephoto lens setting before capturing the image.
To check your existing photo for lens distortion, look straight at the ears. In a properly compressed, undistorted photograph taken from the correct distance, both ears should be visible (unless obscured by hair). If your face looks unusually thin or your nose appears disproportionately large compared to your view in a flat mirror, the camera was positioned too close to your face. You cannot fix lens distortion through software cropping; you must retake the image from further away.
Infant applications require entirely different physical setups
Photographing adults is a matter of following instructions; photographing newborns and infants requires engineering a physical setup that forces compliance without the subject's cooperation. Infants cannot support their own heads, stand against a wall, or focus on a camera lens on command. Yet, the State Department enforces nearly all the same biometric requirements for babies as it does for adults: stark white background, face centered, no accessories, and crucially, no visible support mechanisms.
The most frequent cause of rejection for a baby passport application is the visibility of parental hands. When parents attempt to hold a squirming infant upright against a wall, fingers inevitably creep into the frame, either gripping the waist or supporting the back of the neck. The automated cropping software flags these skin tones as foreign objects in the background area and rejects the image immediately. Consulting a United States baby passport photo guide emphasizes that the environment must be entirely free of external human elements.
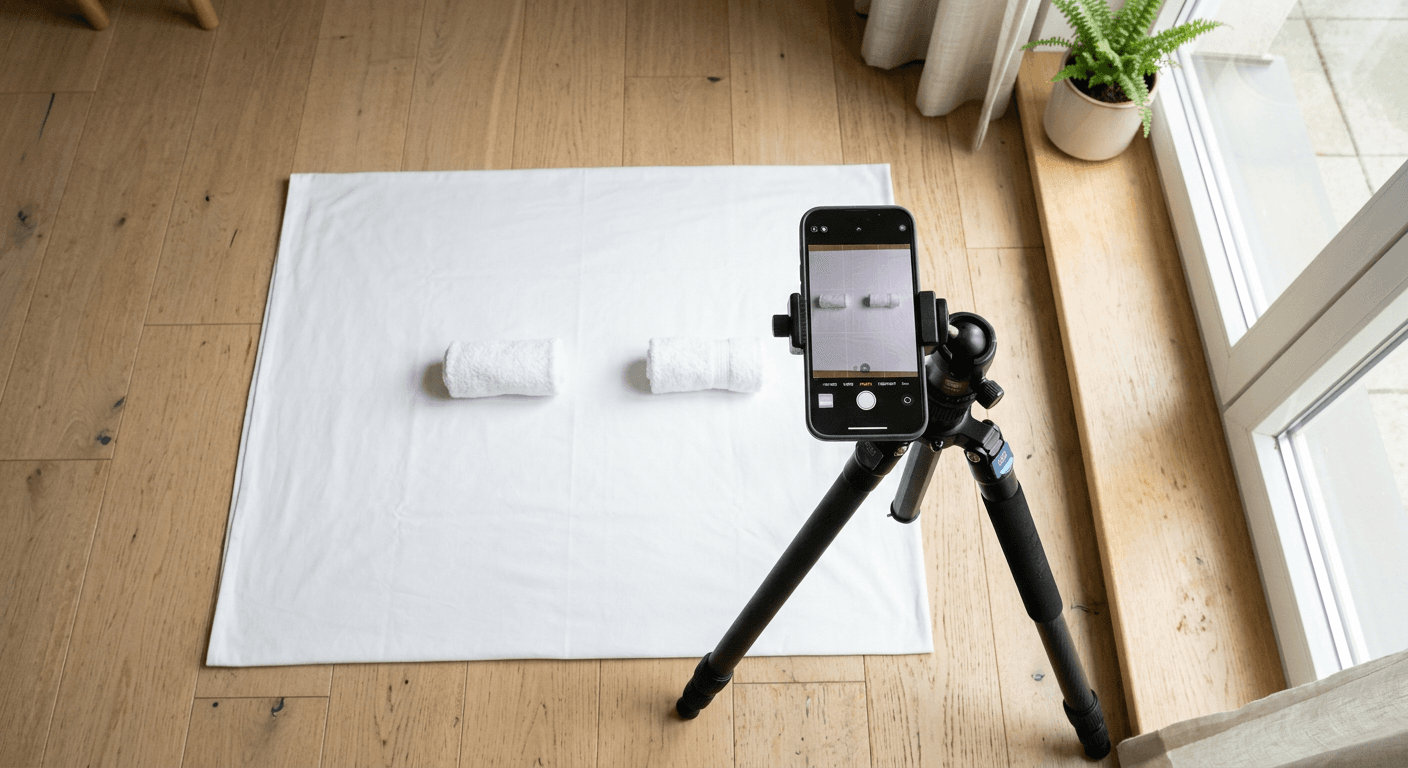
To execute this correctly, you must rely on gravity rather than grip. The flat-lay method involves placing a rigid white poster board or an ironed white sheet on the floor in a room with abundant indirect natural light. The baby is laid flat on their back. For newborns who cannot hold their heads straight, place tightly rolled white towels underneath the sheet on either side of the head. This keeps the face pointing directly upward toward the camera without introducing any visible objects or hands into the final cropped frame.
If you must check your infant's photo, look specifically at the borders of their shoulders and the top of their head. Scan for any trace of an adult finger, a piece of clothing that does not belong to the baby, or the fabric of a car seat peeking through the white background. Even a shadow cast by the parent leaning over the baby will trigger a rejection.
Digital uploads and physical prints demand different resolutions
The US immigration system runs on two distinct tracks: digital uploads for the DS-160 nonimmigrant visa and the Green Card lottery, and physical prints for the DS-11 passport application. Submitting the specifications meant for one track into the other will guarantee a failure, as the technical constraints for digital and physical media differ drastically.
A digital upload requires an image formatted in the sRGB color space. If you export your photo using Adobe RGB or CMYK, the visa portal's backend compression algorithm will misinterpret the color profile, rendering your skin tone unnatural and triggering a rejection. The digital file must be square, with minimum dimensions of 600 by 600 pixels and a maximum of 1200 by 1200 pixels. The file size is strictly capped at 240 kilobytes. Heavy JPEG compression used to shrink a larger file down to this size often introduces artifacts - blocky, pixelated areas around the high-contrast edges of the eyes and mouth - which obscure the biometric data.
| Specification Dimension | Digital Upload (DS-160 / EVUS) | Physical Print (DS-11 Passport) |
|---|---|---|
| Format | JPEG (.jpg) strictly enforced | Printed on matte or glossy photo paper |
| Dimensions | 600 x 600 to 1200 x 1200 pixels | 2 x 2 inches (51 x 51 mm) physically |
| File Size Limit | 240 kB maximum | Not applicable |
| Color Space | sRGB required | Full color (no black and white) |
| Resolution / DPI | Not heavily weighed if pixel dimensions match | Minimum 300 DPI at physical print size |
To verify your digital file, right-click the image on your desktop and view its properties or information panel. Check that the dimensions are perfectly square and fall within the required pixel limits. Then, zoom into the image at 100% scale on your monitor. If the whites of your eyes look jagged or heavily pixelated, you have over-compressed the image to meet the 240kB limit and must export it again with a gentler compression algorithm.
Shadows behind the ears trigger automatic validation failures
Lighting a passport photo is entirely about geometry and distance, not artistic mood. The most common lighting failure is the drop shadow. When you stand with your back touching a white wall and fire a camera flash directly at your face, the flash casts a hard, distinct silhouette of your head and shoulders onto the wall directly behind you. The automated software reads this dark shadow as an extension of your hair or body, meaning it calculates your head width incorrectly, violating the strict biometric ratios.
Conversely, cast shadows on the face itself are equally fatal. Overhead lighting, such as recessed ceiling lights found in most homes, casts dark pools of shadow into the eye sockets and underneath the nose. If the sclera (the white of the eye) is shadowed, the software cannot locate the iris to map pupillary distance. The light must be flat, even, and diffuse, striking the face directly from the front to wash out any facial shadows.
Practical rule: Stand exactly 18 inches away from your background wall; this distance causes harsh flash shadows to drop below the crop line of your shoulders, leaving a clean, shadow-free background directly behind your head.
To test your lighting setup, take a test shot and look specifically at the bottom edge of your chin and the area behind your ears. The white wall immediately behind your ears must be identical in brightness to the white wall above your head. If it is darker, your drop shadow is still visible in the frame. On your face, check the bridge of your nose and the eye sockets. Both eyes must be equally illuminated without heavy contrast underneath the brow bone.
Uniforms and camouflage patterns guarantee an immediate rejection
The US State Department heavily restricts what you may wear in a passport photo. Since 2016, eyeglasses of any kind have been entirely banned. Even if they do not cause glare, the frames obscure the brow line and the edges of the eyes, which are critical mapping points for facial recognition. You must remove them entirely. Furthermore, head coverings are prohibited unless you submit a signed statement verifying that the item is recognized as traditional religious attire worn continuously in public.
Clothing itself carries strict regulations. Uniforms, clothing that looks like a uniform, and camouflage attire are strictly forbidden. This rule exists to prevent military, police, or airline personnel from presenting official capacity on a civilian travel document. The prohibition extends to civilian clothing that mimics tactical gear or features disruptive camouflage patterns. When cross-referencing international baby passport photo specifications, you will notice that this uniform rule applies universally across ages; a baby dressed in a novelty military-style onesie will face the same rejection as an adult in standard-issue fatigues.
Before taking your photo, review your clothing. Choose ordinary, everyday attire in a solid color that contrasts with the white background. Avoid white shirts, as they can blend into the background, making it difficult for the software to detect where your shoulders begin. Ensure your collar does not creep up to obscure your jawline, and verify that your hair is tucked behind your ears to expose the full oval of your face.
FAQ
Can I wear makeup in my US passport photo? Yes, you can wear makeup, provided it does not alter your fundamental facial features. Heavy contouring that drastically changes the shape of your nose or cheekbones will cause a failure at biometric security gates. Keep makeup neutral and natural.
Can I smile in the picture? The US State Department requires a neutral facial expression with both eyes open and the mouth closed. A slight, natural smile that does not show teeth or distort the shape of your eyes is permitted, but an exaggerated, teeth-bearing smile will be rejected.
Does my baby's photo need to show open eyes? Yes, infants must have their eyes open and looking generally toward the camera. The only exception is for newborns, where the State Department accepts photos with eyes partially or completely closed due to physical limitations.
What is the exact background color required? The background must be plain white or off-white, free of any textures, patterns, or shadows. Pure digital white (Hex code #FFFFFF) is acceptable, provided the edge contrast with your hair and clothing is clean and unedited.
Recommended Reads
- Consult this global help center and FAQ database for troubleshooting rejected image uploads.
- Explore the United Kingdom baby passport photo specifications to understand how European standards differ from American ones.