How to Capture a Compliant Foto Passaporto Neonato at Home: A 5-Step Guide
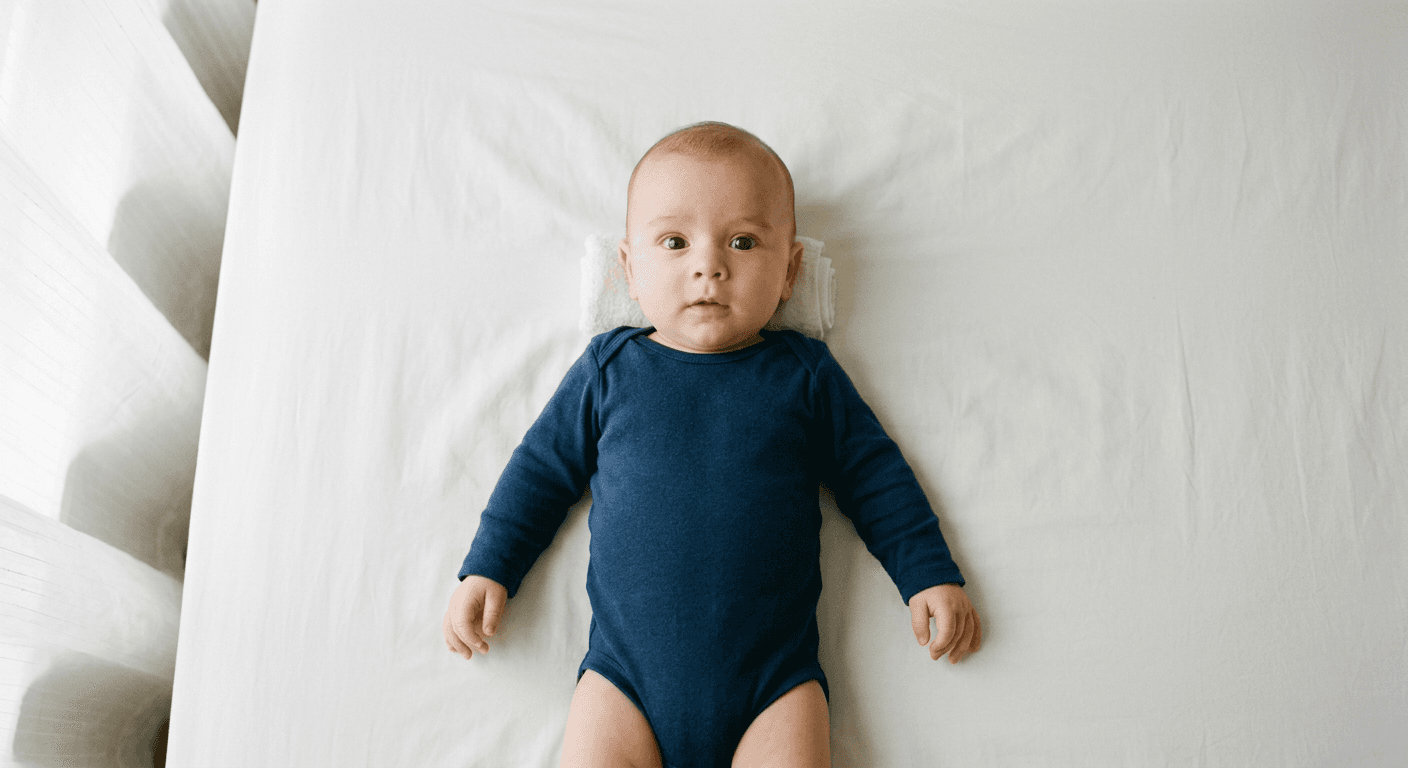
You have finally wrestled your newborn into a plain onesie, laid them flat on a perfectly ironed white sheet, and raised your smartphone camera to take a photo. When you look at the screen, you realize the afternoon sun is casting a sharp, triangular shadow across half their face, while their chin rests so deeply on their chest that their jawline has disappeared entirely. Securing a government-compliant foto passaporto neonato requires navigating biometric rules designed for adults, applied to subjects who cannot sit up, follow directions, or hold their heads still. Failing to meet these strict specifications results in delayed travel documents, rejected visa applications, and repeated attempts to capture a usable image.
Quick Summary
Capturing an official identification photo for an infant involves overriding standard portrait photography habits to satisfy automated biometric scanners. You must eliminate shadows, reveal the full facial geometry, and isolate the subject from the background.
- Rely on indirect light: Direct sunlight creates hard shadows that cause automated rejections.
- Support the neck invisibly: Use rolled towels beneath the sheet to lift the chin without placing hands in the frame.
- Shoot from a distance: Keep the camera at least three feet away and zoom in to prevent optical facial distortion.
- Validate technically: Run the final image through software that checks head-size calibration and background segmentation.
Table of Contents
- Why the Compliant Foto Passaporto Neonato Rejects Standard Lighting
- 1. Preparing the Environment and Lighting
- 2. Positioning the Infant for an Unobstructed View
- 3. Timing the Capture for a Neutral Expression
- 4. Setting a Background That Algorithms Can Read
- 5. Validating Technical Specs Before Submission
- Common Pitfalls & Troubleshooting
- FAQ
- Recommended Reads
Why the Compliant Foto Passaporto Neonato Rejects Standard Lighting
Government passport agencies do not evaluate photos based on aesthetics. They evaluate them based on measurable data points. When a digital or physical photo enters the system, software scans it to locate specific anchor points: the center of the pupils, the tip of the nose, the corners of the mouth, and the curve of the chin.
The Mechanics of Biometric Mapping
The distance between these anchor points forms a unique mathematical template. If a shadow obscures the edge of the jaw, the software cannot calculate the distance from the chin to the crown of the head. If a smartphone lens is held too close to the face, the barrel distortion makes the nose appear larger and the ears narrower, altering the biometric template entirely. Because infants have different facial proportions than adults, capturing an accurate, undistorted map is critical. While some jurisdictions offer leniency for newborns regarding eye contact, the underlying requirement for a clear, evenly lit, unobstructed facial map remains absolute.
1. Preparing the Environment and Lighting
The foundational requirement of any official document photo is flat, even illumination across the entire face. Biometric scanners interpret shadows as physical features. A dark shadow under the nose reads as a different facial structure; a shadow cast across one side of the face reads as asymmetry.
Diffusing the Light Source
To achieve flat illumination at home without professional studio strobes, rely entirely on indirect daylight. Position the baby facing a large window during the day, ensuring the sun is not beaming directly onto them. Direct sunlight creates harsh, high-contrast shadows that immediately fail compliance checks. If the light is too directional, tape a piece of white parchment paper or a sheer white curtain over the window to diffuse it.
The mistake people actually make here is combining natural light with artificial overhead room lighting. Household bulbs have different color temperatures (usually warm yellow or cool blue) than daylight. Mixing the two creates a cross-lighting effect with multiple conflicting shadows and unnatural skin tones. Turn off every lamp and overhead fixture in the room. Let the diffused window light act as your single source.
2. Positioning the Infant for an Unobstructed View
Infants, particularly those under six months, lack the cervical strength to hold their heads upright. When laid flat on their backs, their chins invariably drop toward their chests. This posture hides the neck and obscures the jawline, failing the fundamental requirement that the entire facial outline must be visible.
Managing Lack of Neck Control
To solve this, you must artificially elevate the head and shoulders without introducing unapproved objects into the frame.
Practical rule: Never place your hands on the baby to support their head during the photo. Even a single visible finger or a parent's wrist in the corner of the frame will trigger an automatic rejection.
Instead, place a tightly rolled hand towel in a U-shape under a white sheet. Lower the baby onto the sheet so their neck and shoulders rest precisely over the hidden towel. This gently tilts the head backward, exposing the jawline and catching the window light evenly.
Alternatively, drape a plain white sheet completely over a car seat or baby bouncer. The 45-degree incline naturally supports the head and prevents the chin from dropping. The common failure in this step is the parent leaning over the baby to take the shot from above, inadvertently casting their own silhouette directly over the child's face. If you use the floor method, you must shoot from an angle where your body does not block the window light.
3. Timing the Capture for a Neutral Expression
Biometric standards mandate a neutral expression: mouth closed, eyes open, looking directly at the camera. While newborns are often exempt from the "eyes strictly open" rule depending on the specific country, a crying or yawning baby is universally rejected because an open mouth distorts the geometry of the cheeks and chin.
Avoiding the Startle Reflex
Achieving this state requires careful timing rather than manipulation. Feed and rest the baby before attempting the session. When they are calm, hold a high-contrast toy directly behind your smartphone lens to draw their gaze. Occasionally, parents look for a foto passaporto trucco to force the correct lighting or expression by heavily editing the image afterward. Any synthetic alteration, including digital airbrushing or warping a smile into a closed mouth, leaves digital artifacts in the file. Automated verification gates detect these artifacts and flag the file as fraudulently manipulated.
The mistake people make here is turning on the camera flash to grab the infant's attention. A sudden bright flash triggers the Moro reflex (the startle reflex). The baby will squeeze their eyes shut, throw their arms up, and likely begin crying, effectively ending the photo session. Rely entirely on burst mode in natural light to capture the fleeting moments of a neutral, forward-facing gaze.
4. Setting a Background That Algorithms Can Read
The background of the photo must be entirely uniform, typically pure white or off-white, free of patterns, textures, or secondary objects. This rule exists because modern passport processing relies heavily on automated background segmentation.
The Segmentation Failure Mode
When you upload a digital file, the software attempts to isolate the subject from the background. If the algorithm cannot determine where the baby's shoulder ends and the bedsheet begins, it aborts the process.
The mistake parents make is focusing only on the color of the background and ignoring the texture. A heavily wrinkled sheet, a textured fleece blanket, or a quilted mattress protector will create hundreds of micro-shadows. The camera captures these shadows as dark gray lines. Ensure the fabric you use is pulled taut and completely smooth. Furthermore, dress the baby in a dark, contrasting color like navy blue or dark red. If an infant wears a white onesie against a white sheet, the resulting lack of contrast creates a "floating head" effect, which segmentation algorithms cannot process.
5. Validating Technical Specs Before Submission
Capturing the raw image is only half the process; formatting it to the exact legal dimensions is where the majority of applications fail. Different governments maintain radically different specifications for print dimensions, digital file sizes, and head-size calibration.
Running the Automated Checks
Before you print the image at a pharmacy kiosk or upload it to a government portal, it must be accurately cropped. The head must occupy a specific percentage of the total image area. For instance, the US requires the head to measure between 1 and 1 3/8 inches on a 2x2 inch print.
Because manually measuring pixels is error-prone, running the raw file through a dedicated digital passport photo generator prevents manual rejections. AI-powered platforms perform automated biometric compliance checks, detecting the face, removing the background, and centering the head according to the target country's rules. Reviewing the United States baby passport photo guidelines is essential to ensure the final crop aligns with specific consular expectations.
The common mistake in this final step is cropping the image too tightly. Parents often frame the baby's face so large that there is no white space left above the head. Passport office clerks need that surrounding white space to use their physical die-cut tools; if the face stretches to the edges of the print, the die-cutter will slice off the top of the head, invalidating the photograph.
Common Pitfalls & Troubleshooting
Even with correct lighting and positioning, specific failures frequently derail the process. They often look identical to the untrained eye but require completely different interventions.
The "Floating Head" Rejection
- Symptom: The subject's shoulders vanish into the background, causing automated software to reject the photo for missing body boundaries.
- Diagnosis: The infant is wearing clothing that exactly matches the color and luminance of the background sheet.
- Fix: This is the most common cause of segmentation failure. Change the baby into a dark, solid-colored shirt that creates a stark, high-contrast line against the white background.
The Asymmetrical Gaze Failure
- Symptom: The infant appears to be looking forward, but the photo is rejected because only one ear is clearly visible, or one side of the face appears narrower.
- Diagnosis: The camera lens was centered over the forehead or the chest rather than directly over the nose, or the smartphone was tilted rather than held perfectly parallel to the floor.
- Fix: Use your smartphone's built-in grid feature. Hold the phone completely flat, perfectly parallel to the baby's face, and center the crosshairs exactly on the bridge of their nose.
The Optical Distortion Rejection
- Symptom: The center of the face appears bulbous, the nose is disproportionately large, and the ears recede into the background.
- Diagnosis: The camera was held too close to the subject. Wide-angle smartphone lenses warp geometry when placed within two feet of a subject.
- Fix: Move the camera back to a distance of at least three to four feet. Use the 2x or 3x optical zoom feature (never the digital zoom) to reframe the face. This flattens the perspective and accurately captures the biometric map.
The Resolution Drop
- Symptom: The printed photo is pixelated and blurry, despite the original smartphone image looking incredibly sharp.
- Diagnosis: The file was transferred between devices using a messaging app (like WhatsApp or iMessage). These applications aggressively compress image files to save bandwidth, stripping away the necessary dots-per-inch (DPI) required for printing.
- Fix: Always transfer the final file via email at its "Original" or "Maximum" size, or use a direct cloud storage link to preserve the uncompressed resolution before taking it to a kiosk.
FAQ
Can an infant have their eyes closed in a passport photo? It depends entirely on the country. Some jurisdictions offer leniency for newborns and infants under six months, accepting photos with closed or partially open eyes. Others strictly require open eyes for all ages. You must check the exact consulate rules for your specific application.
Do I need to remove my baby's pacifier? Yes. Pacifiers, teething rings, and anything else that obscures the mouth or cheeks must be removed. The entire lower half of the face must be fully visible for biometric mapping.
What if my baby has a medical device taped to their face? If a medical device obscures part of the face, you must submit a signed letter from a licensed physician explaining that the device is medically necessary and cannot be removed for the photograph. The passport agency will evaluate these on a case-by-case basis.
Is it acceptable to hold the baby in the photograph? No part of a parent or guardian can be visible. If you must support the baby from behind, ensure your hands are completely out of the frame and obscured by clothing or blankets. Visible hands, fingers, or even parental clothing in the background will result in an automatic rejection.
Can I use a photo taken with a digital portrait mode? No. Smartphone portrait modes use software to artificially blur the background (the bokeh effect). This artificial blurring often bleeds over onto the edges of the hair or ears, corrupting the crisp edge required for biometric verification.