Demystifying dimensioni foto passaporto: A Technical Guide to Biometric Ratios
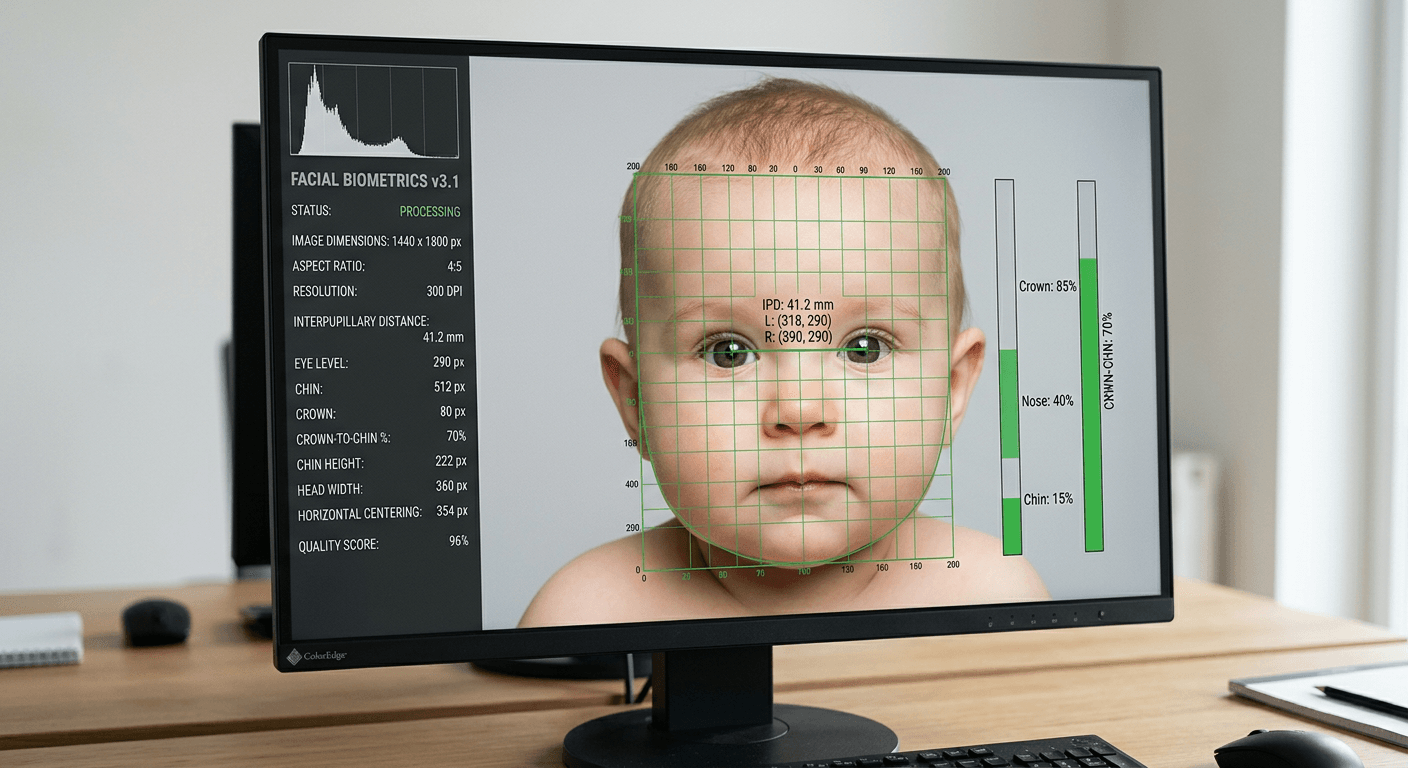
A digital image resized to a 2x2-inch square is not automatically a valid biometric identity document. The physical or digital boundary is the least critical measurement in modern identity verification. When government servers parse an uploaded file, they do not see a portrait; they read a topographical map of the subject's face. Establishing the correct dimensioni foto passaporto requires calculating the exact interpupillary distance, verifying the chin-to-crown ratio against strict mathematical thresholds, and ensuring the color space matches the agency's parsing algorithm. Treating an identity document like a standard digital upload guarantees an immediate automated rejection before a human operator ever sees the file. This guide breaks down the exact mechanical specifications and file formats required to pass biometric screening software.
Quick Summary
Submitting a compliant passport image requires exact alignment of pixel density, facial proportions, and file formatting to pass automated biometric checks. Failing to match the required technical specifications causes instantaneous database rejection.
- Verify the raw megapixel count and avoid upsampling low-resolution source files.
- Lock the correct aspect ratio to prevent horizontal or vertical facial distortion.
- Calibrate the head size to occupy precisely 70 to 80 percent of the vertical frame.
- Export the final file in an sRGB color space using moderate JPEG compression to prevent skin tone shifts.
Table of Contents
- 1. Verify the Underlying Resolution and Pixel Density
- 2. Establish the Correct External Proportions
- 3. Calibrate Head Size and Eye Position
- 4. Export Using Compliant File Formats and Compression
- 5. Segment the Background Without Distorting Hairlines
- Common Pitfalls & Troubleshooting
- FAQ
- Recommended Reads
1. Verify the Underlying Resolution and Pixel Density
Upsampling Destroys Facial Detail
Digital identity files operate on absolute pixel counts rather than physical print dimensions. While a physical application might require a 2x2-inch square print, a digital portal demands a specific grid, typically 600 by 600 pixels or 1200 by 1200 pixels at a minimum. The raw photographic capture must exceed this baseline to preserve detail. When you upload an image captured at a low resolution, the underlying software attempts to stretch the existing data over a larger pixel grid. This mathematical process, known as bicubic interpolation, artificially calculates new pixels by averaging the colors of adjacent ones.
The resulting digital file suffers from subtle blurring across all high-frequency edges. Biometric algorithms anchor their facial mapping on sharp transitions: the dark pupil against the white sclera, the shadow line of the lips, and the distinct edge of the nostril. Interpolation softens these crucial transitions, causing the automated scanner to fail its alignment phase entirely.
Practical rule: Never increase the pixel dimensions of a source file using a digital scaling tool; always capture at a high native resolution and scale the image downward to fit the upload constraints.
The most frequent error occurs when applicants transfer files through mobile messaging applications. These applications automatically downscale the image payload to 72 pixels per inch to save bandwidth, permanently stripping out the critical structural detail required for a successful biometric scan. Always transfer the original, uncompressed file via direct cable connection or cloud storage before beginning any crop or layout adjustments.
2. Establish the Correct External Proportions
Aspect Ratio Dictates Biometric Mapping
Aspect ratio governs the geometric relationship between the width and height of the file. Every passport authority defines a strict proportional boundary that dictates how the final grid sits around the face. The United States standard mandates a 1:1 ratio, resulting in a perfectly square output grid. Conversely, European and Schengen zone applications require a 35 by 45-millimeter rectangle, establishing a roughly 7:9 vertical ratio.
Most European states require the standard formato foto passaporto. It relies on this taller aspect ratio. Attempting to apply a square crop tool to a rectangular specification severely distorts the subject's face. If you force a 35x45mm image into a 1:1 box without cropping the excess height, the software compresses the horizontal axis. This directly alters the subject's interpupillary distance. This is the exact measurement between the centers of the eyes. Facial recognition databases rely on this specific distance as the foundational anchor metric for identifying an individual across their lifetime.
Any artificial alteration of this width results in immediate rejection, as the subject's facial geometry no longer falls within normal human parameters. Reviewing a Germany baby passport photo guide ensures you map the correct mathematical ratio before applying any digital crop. Lock the aspect ratio in your editing software prior to adjusting the framing, so the image scales proportionately without compressing the horizontal or vertical planes.
3. Calibrate Head Size and Eye Position
Improper Scaling Causes Automatic Rejection
Beyond the external borders, the internal composition carries strict mathematical constraints defined by the International Civil Aviation Organization (ICAO). The primary biometric metric is the vertical ratio of the head relative to the total image height. The distance measured from the lowest point of the chin to the uppermost crown of the skull must occupy strictly between 70 and 80 percent of the vertical frame in almost all jurisdictions.
Calculating the internal misura foto passaporto involves locating the actual structural crown of the head, not the top of the hair. For infants with wispy or voluminous hair, aligning the top crop line with the hair rather than the skull pushes the face too far down in the frame. Consequently, the eyes drop below the required horizontal axis. Most digital document scanners mandate that the eye level sit precisely between 50 and 70 percent of the image height, measured from the bottom edge upward.
When parents attempt to include a baby's shoulders and chest in the frame to make the photo look like a traditional portrait, they inadvertently shrink the head size below the 70 percent minimum threshold, guaranteeing an automated failure. A United States baby passport photo guide provides specific schematics on mapping the chin-to-crown ratio accurately on a digital grid, ensuring the eyes align with the scanner's expected horizontal reading zone.
4. Export Using Compliant File Formats and Compression
Color Profiles Alter Skin Tone Verification
File format and color space metadata dictate exactly how the government portal interprets the pixel data on the screen. Immigration databases and automated systems are built strictly to process the sRGB color space. However, modern smartphone cameras, particularly high-end models, frequently capture and export images in Display P3 or Adobe RGB - color spaces that contain a significantly wider gamut of data.
When preparing a foto digitale formato tessera for web submission, failing to convert the profile to sRGB causes severe rendering errors. The government server routinely strips the unrecognized Display P3 metadata and assigns an sRGB profile by default upon upload. This abruptly shifts the underlying color values, rendering skin tones with a washed-out, grey, or artificially saturated red hue. Automated skin-tone verification checks flag these unnatural colors as evidence of digital manipulation or heavy filtering, triggering a manual fraud review.
Furthermore, the file must be exported as a baseline JPEG, as high-efficiency formats like HEIC or lossless PNGs are rejected by legacy government architecture. Heavy JPEG compression introduces macroblocking - visible 8x8 pixel squares of uniform color that destroy the smooth gradient of shadows on the cheeks and nose. Consulting an Australia baby passport photo guide reinforces the strict limits on file compression sizes and the absolute prohibition against altered color profiles.
5. Segment the Background Without Distorting Hairlines
Artificial Edge Detection Leaves Visible Halos
Background requirements demand absolute uniformity. Depending on the nation, the background must be pure white or a light, neutral grey, entirely free of shadows, textures, or physical creases. Achieving this digitally often leads to the most visible form of image tampering: artificial edge segmentation.
Whether the final output is a physical print or a fototessera o foto tessera submitted digitally, the separation between the subject and the background must remain perfectly sharp and entirely natural. When users attempt to remove a busy background using basic magic wand tools or automated masking algorithms, the software struggles with the transition around wispy infant hair or lightly colored clothing that blends into the background. This failure leaves a jagged, pixelated edge or a visible colored halo around the subject's head. Document scanners are specifically programmed to detect these irregular edge gradients as signs of digital forgery or compositing.
Similarly, placing an infant on a white bedsheet and heavily overexposing the image to blow out the wrinkles destroys the highlight detail on the subject's face, flattening the nose bridge so the algorithm cannot read it. Checking a United Kingdom baby passport photo guide details the necessity of achieving a shadow-free background through flat, even physical lighting rather than relying on digital erasure.
Common Pitfalls & Troubleshooting
File Size Exceeds Portal Constraints
- Symptom: The upload portal freezes, times out, or returns a generic error 500 without explaining the biometric failure.
- Fix: Government servers frequently cap uploads at 240 KB or 500 KB to manage database storage limits. Strip the EXIF metadata (excluding the mandatory sRGB color profile) and apply a light JPEG compression setting. Never drop the resolution below the required 600x600 pixel count to achieve a smaller file size; adjust the compression slider instead.
Shadows Mapped as Facial Asymmetry
- Symptom: The application is rejected with a notice citing "poor lighting," "facial distortion," or "uneven exposure."
- Fix: A dark shadow cast across one side of the nose or cheek alters the pixel gradient the algorithm uses to calculate facial depth. Do not attempt to fix this by digitally brightening the shadows with a dodge tool, as this alters the fundamental pixel map. You must recapture the image using flat, direct, frontal lighting. Reviewing baby passport photo requirements by country helps identify which nations mandate absolute lighting uniformity and prohibit flash photography.
Halos Around the Crown and Ears
- Symptom: Instant rejection for "digital manipulation," "compositing," or "non-uniform background."
- Fix: This occurs when a digital background removal tool fails to correctly mask the boundary between the hair and the environment. Do not use manual brush tools to paint a white border around the subject. If the automated segmentation fails, the original background lacked sufficient contrast with the subject. Recapture the photo against a physically contrasting, smooth backdrop.
Eye Level Falls Below the Minimum Axis
- Symptom: The portal's automated cropping tool cuts off the top of the head when attempting to align the eyes, or throws a vertical alignment error.
- Fix: The subject's eyes are positioned too low in the uncropped source file. You must recenter the image so the eyes sit slightly above the exact middle of the vertical frame (typically around the 60 percent mark). Ensure the chin-to-crown measurement remains strictly within the 70 to 80 percent boundary while shifting the entire image upward on the canvas.
FAQ
Can I use a high-resolution PNG for a digital passport application? No. Nearly all immigration and passport portals require standard baseline JPEG format. Government database constraints and standardized EXIF reading mechanisms depend on JPEG architecture to parse metadata and manage server storage limits. A PNG file will either fail to upload or be automatically rejected by the server's pre-flight check.
Does the DPI setting matter if the pixel dimensions are correct for a digital upload? For strict digital-only uploads, the absolute pixel dimensions (like 600x600) govern the file size, making DPI irrelevant to the screen display. However, if the digital file is eventually printed by the passport agency for a physical booklet, setting the metadata tag to 300 DPI ensures their local software renders the physical output at the correct biometric measurements.
How do I calculate the head percentage in a digital file? Multiply the total vertical pixel count of your image by 0.70 and 0.80. The physical pixel distance from the lowest shadow of the chin to the top of the skull must fall squarely between those two numbers. For a 1000-pixel high image, the head must measure between 700 and 800 pixels tall.
Why do smartphone cameras distort the facial aspect ratio? Modern smartphone default lenses are wide-angle, usually equivalent to a 24mm or 26mm focal length. When positioned too close to a subject, these lenses push the center of the image forward, enlarging the nose and narrowing the ears. You must step back at least 1.5 meters and use the optical telephoto zoom (2x or 3x) to flatten the facial plane and capture true biometric proportions.