A Guide to Biometric Dimensioni Foto Passaporto and Global Digital Sizing Rules
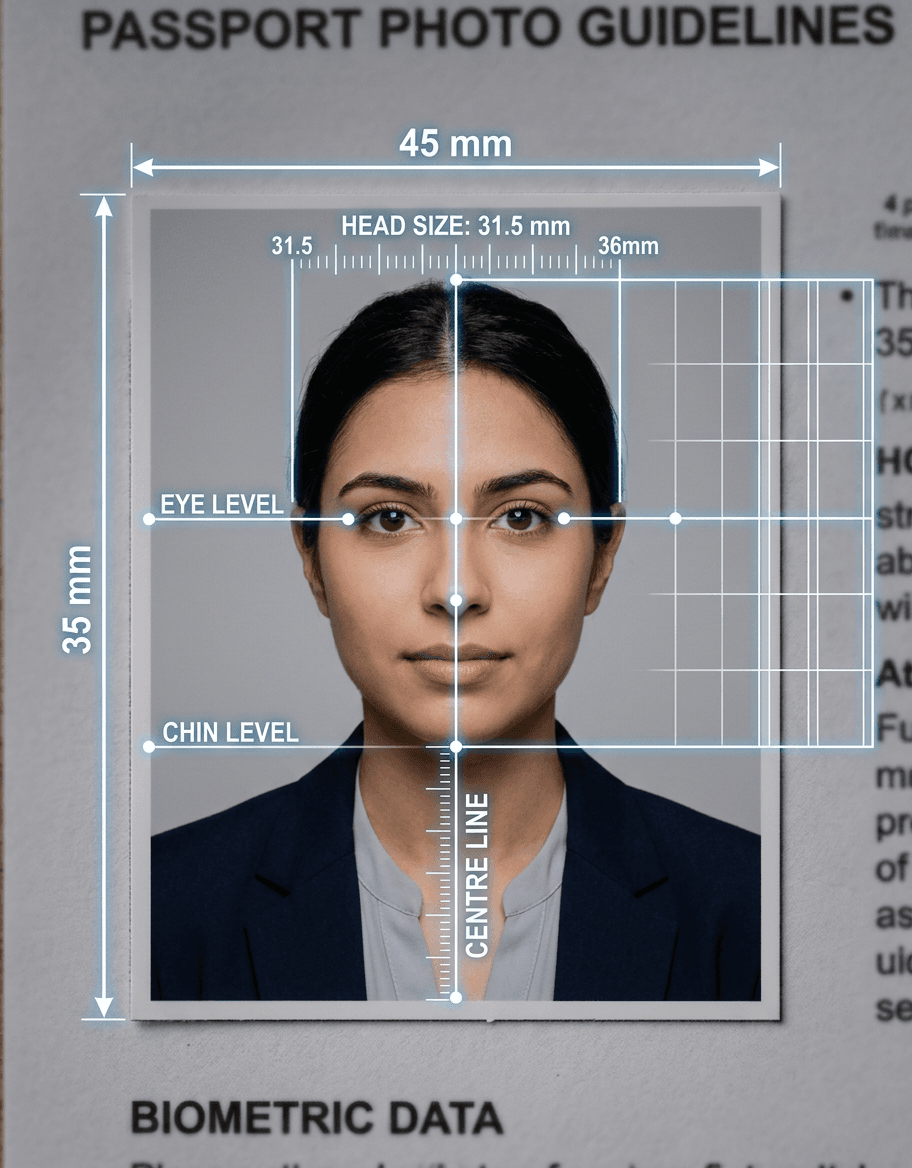
A passport applicant submits their digital file only to receive a rejection notice three days later because of a two-millimeter crop error. When dealing with strict international standards, understanding the precise dimensioni foto passaporto (passport photo dimensions) is the difference between seamless travel prep and a rejected application. Biometric scanners do not negotiate; they rely on exact geometric landmarks. If your head is tilted by a fraction of a degree, or if the background has a faint shadow, automated systems will reject the file instantly. This guide breaks down the physical dimensions, digital configurations, and cropping mechanics required to meet rigorous global standards.
Quick Summary
Standard European and ICAO passport photos must measure exactly 35x45 mm, with the face occupying 70% to 80% of the frame vertically. Digital files require a minimum resolution of 300 DPI, neutral lighting, and a solid, shadow-free background to successfully pass automated government biometric scans.
- Exact Physical Sizing: The layout must conform to 35x45 mm dimensions.
- Strict Facial Proportions: The distance from chin to crown must be 31.5 mm to 36 mm.
- Digital Target Resolution: Standard files require 413 x 531 pixels at 300 DPI.
- Biometric Optimization: Backgrounds must be uniform, neutral, and completely shadow-free.
Table of Contents
- Understanding Biometric Dimensioni Foto Passaporto and Global Standards
- How to Format and Crop ID Photos: A Step-by-Step Biometric Guide
- Step 1: Establishing the Aspect Ratio and Physical Margins
- Step 2: Controlling Lighting and Contrast to Prevent Biometric Rejection
- Step 3: Positioning the Subject and Aligning the Eye Line
- Step 4: Managing Digital Output and File Compression
- Step 5: Reviewing the Final Print Layout and Paper Specifications
- Common Pitfalls & Troubleshooting
- FAQ
- Recommended Reads
Understanding Biometric Dimensioni Foto Passaporto and Global Standards
In the world of international travel documentation, a millimeter is a massive unit of measure. The global standard for biometric identification is governed by the International Civil Aviation Organization (ICAO), specifically Document 9303. This document outlines the physical and technical specifications for Machine Readable Travel Documents (MRTDs). Understanding the physical size parameters known as dimensioni foto passaporto is essential for meeting these requirements.
While the 35x45 mm misura foto passaporto (passport photo size) is standard across Italy, the European Union, the United Kingdom, and Australia, other regions use entirely different dimensions. For example, the United States and India require a square 2x2 inch (51x51 mm) format. Canada uses a 50x70 mm format. Thus, simply knowing "how to take a passport photo" is not enough; you must know the destination country's exact framework. You can review the official baby passport photo requirements by country to understand how these specifications shift across different international jurisdictions.
Biometric systems rely on these standardized dimensions to locate human features within a pre-defined search grid. The software does not examine the photo the way a human eye does; instead, it converts the pixels into a vector map of facial coordinates. It measures the distance between your pupils, the width of your nose, and the vertical distance from your eye line to your chin. If the photo dimensions or alignment are off by even a fraction, the facial recognition system will look for the eyes in the wrong coordinates, failing to register the face entirely and resulting in an immediate rejection.
How to Format and Crop ID Photos: A Step-by-Step Biometric Guide
Step 1: Establishing the Aspect Ratio and Physical Margins
The foundation of a compliant ID document lies in its geometric boundaries. When establishing the aspect ratio, you must focus entirely on the target country's specific layout ratios. For EU countries following ICAO guidelines, the physical size must be 35 mm in width and 45 mm in height. This creates a specific 7:9 aspect ratio.
The primary mechanical requirement is that the head, from the bottom of the chin to the top of the hair (including the hair outline), must measure between 31.5 mm and 36 mm. This equates to 70% to 80% of the overall vertical height of the photo. Additionally, the horizontal distance between the centers of the eyes must be a minimum of 8 mm, and the eyes must be positioned between 28 mm and 35 mm from the bottom edge of the photo. This specific layout is what defines the official formato foto passaporto (passport photo format).
The most common mistake at this stage is "eyeballing" the crop using a generic smartphone photo editor. People often zoom in too closely to make the face clear, which cuts off the crown of the head or reduces the background breathing room. Conversely, leaving too much space above the head makes the face too small for biometric face-matching algorithms to map the key nodal points. A deviation of even one millimeter in head height will trigger an automatic rejection when the file is processed.
Step 2: Controlling Lighting and Contrast to Prevent Biometric Rejection
Correct lighting is not an aesthetic choice; it is a structural necessity for facial recognition software. Biometric scanners construct a 3D mathematical map of your face using the shadows and highlights generated by your features. If you use a single, strong light source from one side, the nose casts a shadow over the opposite cheek, hiding half of the facial landmarks.
To set up compliance-grade lighting, you must use a balanced, multiple-source setup or highly diffused natural light. The primary light (key light) should be positioned at a 45-degree angle to the side of the camera, while a second light (fill light) sits on the opposite side to soften any shadows. A third light can be directed at the background to eliminate the shadow cast by the subject’s head and shoulders. The background itself must be completely uniform, void of patterns, and a neutral, light color - ideally off-white or light gray.
Practical rule: Avoid using a direct camera flash; instead, position the subject facing a large window with natural light and use a secondary white reflector board to fill in side shadows.
The major pitfall here is relying on standard overhead residential lighting. Ceiling fixtures cast downward shadows, causing dark pockets under the eyes, nose, and chin (often referred to as the "raccoon eye" effect). These dark areas obscure the lower eyelids and mouth corners, which are critical biometric landmarks.
Step 3: Positioning the Subject and Aligning the Eye Line
Camera placement and subject posture dictate the spatial relationship of facial features. If the camera is positioned too high or too low, the physical distance between the eyes and the chin appears compressed or elongated on the sensor. This distortion is fatal for passport processing.
The subject must sit or stand straight, with shoulders square and level. The camera lens must be positioned exactly at the subject’s eye level, perpendicular to the face. The distance from the camera to the subject should be at least 1.5 to 2 meters (5 to 6.5 feet). At this distance, using an optical zoom (equivalent to 50mm to 85mm focal length) prevents the barrel distortion inherent in wide-angle lenses, which unnaturally expands the center of the face. The subject's head must be perfectly upright, with no tilt toward either shoulder, and the gaze must be fixed directly on the lens.
The mistake most commonly made here is shooting from a slightly elevated angle. People are trained to take selfies from a high angle because it slims the face, but this shifts the eye line and reduces the visible chin-to-nose ratio, causing biometric validation algorithms to flag the photo as tilted.
Step 4: Managing Digital Output and File Compression
Once the image is captured, it must be translated into digital parameters that the government's portal can ingest. In Italy, for instance, uploading a foto digitale formato tessera (digital passport photo) requires a precise balance of compression and resolution.
A standard foto per passaporto elettronico (photo for electronic passport) must be formatted to an exact pixel dimension when submitted online. At the standard scanning resolution of 300 DPI (dots per inch), a 35x45mm photo translates to exactly 413 pixels wide by 531 pixels high. If the portal requires 600 DPI, the dimensions must be doubled to 826 x 1062 pixels. The file format must be JPEG or JPEG2000, and the file size must typically stay within a range of 100 KB to 500 KB. The color profile must be set to sRGB, which is the universal standard for digital displays.
The most frequent failure in digital preparation is over-compression. To meet strict file size limits, users often use online file shrinkers or send the image through messaging apps. These tools apply aggressive lossy compression, which introduces "JPEG block artifacts" - visible pixel squares around the eyes and mouth. The digital system reads these artifacts as physical anomalies, resulting in immediate rejection.
Step 5: Reviewing the Final Print Layout and Paper Specifications
If your application requires physical prints rather than a digital upload, the transition from screen to paper must be handled with professional precision. Physical prints must be durable, sharp, and cut to the exact millimeter.
When generating a physical fototessera o foto tessera (standard passport photo print), you must print on high-quality photographic paper, which can be glossy or matte but must not have any texture. The print system must use a resolution of at least 300 DPI to ensure the image does not show visible dots or pixelation. The printer settings must be configured to "borderless printing" at "100% scale" (or "Actual Size") to prevent the operating system from shrinking or stretching the template to fit default page margins. Once printed, the photos must be cut cleanly using a slide cutter or a dedicated photo punch tool, as jagged edges from standard scissors can cause the physical application to be turned away.
The common mistake here is using cheap, multi-use home inkjet paper. This paper absorbs ink unevenly, causing colors to bleed and lines to blur, which rounds off the sharp borders of the eyes and pupils. Additionally, printing with low ink levels causes horizontal banding across the face, which disrupts the scanning software.
Common Pitfalls & Troubleshooting
When you upload your photo to an official electronic application portal, the automated verifier may return a generic "Biometric Check Failed" or "Image Unusable" error. This generic message can be caused by several distinct physical or digital failures that look identical from the outside but require different fixes.
- Micro-Shadows on the Background:
- Symptom: The photo looks clean, but the system rejects it for "non-uniform background."
- Root Cause: The subject was standing too close to the background, and the ambient lighting created a faint, soft shadow behind the shoulders or ears. The edge-detection algorithm struggles to distinguish the boundary of the head from the background.
- The Fix: Move the subject at least 3 to 4 feet (1 meter) away from the wall. This allows the light to wrap around the subject, eliminating the drop shadow. If needed, use a secondary light source pointed directly at the wall behind the subject.
- Barrel Distortion (The "Smartphone Nose" Effect):
- Symptom: The proportions look correct to your eye, but the system rejects the facial geometry.
- Root Cause: The photo was taken too close to the subject using a standard smartphone wide-angle lens (typically 24mm to 28mm equivalent). This distorts the spatial perspective, making the nose appear larger and the ears appear smaller or hidden behind the head.
- The Fix: Step back at least 6 feet (2 meters) from the subject and use the 2x or 3x telephoto optical lens on your smartphone, or zoom in optically. This flattens the facial plane and maintains correct biometric proportions.
- Compression Artifacts and Metadata Stripping:
- Symptom: The physical print looks perfect, but the digital upload fails with a "corruption" or "low-quality" error.
- Root Cause: The photo was transferred using a messaging app or a quick-export tool that compressed the image or stripped its EXIF metadata.
- The Fix: Transfer the file via direct USB connection, AirDrop, or as an uncompressed attachment in an email. Save the file strictly as a high-quality JPEG with zero compression optimization.
- Inaccurate Head-to-Frame Calibration:
- Symptom: The face is centered, but the crop does not align with biometric templates.
- Root Cause: The photo was cropped manually by "eyeballing" the center without using a precise biometric scale.
- The Fix: Use an automated digital tool or a physical grid template to measure the exact distance from chin to crown. Ensure it occupies exactly 70% to 80% of the vertical space. You can utilize an online digital passport photo generator to automatically handle the alignment, crop, and background removal based on official biometric rules.
FAQ
Why are home-printed passport photos often rejected at the post office or consulate? The primary reason is paper and ink quality. Standard home inkjet printers deposit microscopic droplets that can bleed on porous paper, blurring the sharp edges of the iris, pupil, and nose bridge. Additionally, home users often forget to disable scaling in their printer settings, which shrinks the 35x45mm template to fit margins, violating the physical size rules.
What is the exact difference between a standard passport photo and a visa photo? While many visas accept standard passport dimensions, some major destinations do not. For example, a US visa requires a 2x2 inch (51x51 mm) photo, whereas a Schengen visa application requires a standard 35x45 mm photo. Always check the specific consular guidelines for your destination country, as visa requirements are often updated independently of passport regulations.
Can I wear jewelry, headwear, or glasses in my digital passport photo? Headwear is strictly prohibited unless worn for religious or medical reasons, and even then, it must not cast shadows or obscure any part of the face from the bottom of the chin to the top of the forehead. Glasses are highly discouraged because reflections on the lenses or thick frames obscuring the eyes will cause immediate automated rejection. Small, non-reflective jewelry is generally acceptable as long as it does not catch light or cover facial features.
Why does biometric software require a neutral facial expression with a closed mouth? Smiling or opening the mouth changes the shape of the mouth, elongates the jawline, and alters the distance between the nose and the chin. Biometric scanning algorithms compare these facial distances against database templates; any distortion caused by muscle movement can prevent the software from matching your face to your identity record.